How to Use a Benchtop Planer
To use a benchtop planer, plane one face flat first, then feed the board through with light passes until it's even. Set the depth of cut small, keep the grain running the same way on every pass, and support the board on both sides to limit snipe.
On this page (9 sections)
- What does a benchtop planer actually do?
- How do you prepare stock before the first pass?
- How do you set the depth of cut on a benchtop planer?
- How do you feed a board through the planer?
- How do you deal with snipe at the ends of a board?
- How do you keep boards flat and avoid tearout?
- What safety steps matter most when planing?
- How do you finish a board after planing?
- Which planer and support gear should you buy?
To use a benchtop planer, joint one face flat first, then feed the board through in light passes until it's an even thickness. Set a small depth of cut, keep the grain direction consistent, and support the board on both sides to limit snipe.
The planer is a finishing tool, not a flattening tool. It copies the face that sits on the bed, so the quality of your first face decides the quality of the board you get out.
What does a benchtop planer actually do?
A benchtop planer makes one face parallel to the other and brings the board to a set thickness. It does not flatten a twisted or cupped board on its own.
The cutterhead spins above the bed and shaves the top face as the feed rollers pull the board through. Whatever sits on the bed becomes the reference, so a warped face gives you a warped board with a smooth top.
That's why the first step is always to create a flat face and a square edge. A jointer does that job.
Our guide to how to use a benchtop jointer covers the flattening step, and what a thickness planer is used for explains where the planer takes over.
Once the board has one flat face, the planer earns its keep. It evens thickness across boards, cleans up saw marks from the mill, and brings a rough board to a surface you can sand and finish.
How do you prepare stock before the first pass?
Start with a board that has one flat face and one square edge, then cut it a little long. Rough lumber arrives with mill marks, dried ends, and often a bit of twist that the planer can't fix.
Check each board with a straightedge before it goes near the machine. If it rocks or shows daylight under the edge, it needs the jointer first.
Cut off cracked or checked ends, since the planer can tear out around a split. Leave about 2 inches of extra length so any snipe at the ends falls outside your final part.
Plane boards in matched pairs or sets when you can. Run them in the same order and take the same number of passes so the thickness stays consistent across a project.
Clean grit and metal off the faces before planing. A stray staple or a patch of embedded sand dulls blades fast and can nick the edge.
How do you set the depth of cut on a benchtop planer?
Set the depth of cut small, measure the board after each pass, and stop when you reach your target thickness. The depth dial moves the cutterhead down, so the setting is the amount removed in one trip.
The WEN PL1252 adjusts from 0 to 1/8 inch per pass. Stay well under that ceiling for everyday work: 1/32 inch or less on hardwood, and no more than 1/16 inch on softwood.
Measure the board in several spots before you start. The planer takes the same amount off the whole face, so the thinnest corner decides when you stop.
Set the dial, lock it if the machine has a lock, and make one pass. Measure again, then adjust if needed.
Small steps keep the motor under less load and give a cleaner cut.
The WEN takes boards up to 12.5 inches wide and 6 inches thick. Its 15 A motor runs 20,000 cuts per minute at a 26 feet per minute feed rate, and it ships with two reversible 12.5-inch SK5 blades.
How do you feed a board through the planer?
Feed the board in the direction the grain runs, with the flat face down on the bed and the board held flat. Let the feed rollers take it; don't push.
Stand to one side of the infeed rather than behind the board. If something kicks back, you're out of the line of fire.
Keep a light, even hand on the board as it enters. The rollers grab it after a few inches and pull it through at the machine's feed rate.
Catch the board as it exits and keep it level with the bed. Letting the end drop as it comes out is the most common cause of snipe.
Turn the board end for end between passes, so the grain direction stays the same relative to the cutterhead. Feeding against the grain lifts the fibers and leaves a fuzzy surface.
How do you deal with snipe at the ends of a board?
Support the board on both sides so it stays level with the bed, and plan for a little snipe on the first and last few inches. Snipe is a shallow dip where the board loses support as it enters or leaves the cutterhead.
Infeed and outfeed tables are the usual fix. The WEN PL1252 includes height-adjustable tables that support the workpiece and help limit snipe.
If your planer doesn't have them, a roller stand set level with the bed does the same job. The SHALL stand adjusts from 27.8 to 43 inches and holds up to 250 lb on its 11.5-inch steel roller.
Cut boards a couple of inches long so the snipe lands in the waste. Feed boards end to end when you can, so the next board supports the tail of the one ahead of it.
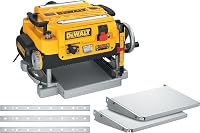
The DeWalt DW7351 folding tables bolt onto the DW735 planer and add 13 inches of surface on each side. They're a fit for that machine only.
How do you keep boards flat and avoid tearout?
Take light passes, keep the grain consistent, and check the blades. Tearout and ridges usually come from too deep a cut, dull blades, or a board fed against the grain.
Look at the edge of the board to read the grain direction. Feed so the cutterhead cuts with the grain, and if the surface fuzzes up, turn the board around.
Dull blades leave ridges and burn marks. The WEN's two SK5 blades are reversible, so you can flip them once before replacing them.
Very figured wood, like curly maple, tears out even with a light cut. Take finer passes and accept a little extra sanding on those boards.
Check the board for flatness between passes with a straightedge. A board that rocks after planing points to a face that wasn't flat to begin with, so send it back to the jointer.
What safety steps matter most when planing?
Wear eye protection and hearing protection, keep your hands clear of the cutterhead, and never reach into the machine while it's running. The planer throws chips and runs loud.
Keep sleeves and jewelry out of the infeed and outfeed openings. Use a push stick or a scrap board to clear a jam, and unplug the machine first.
Let the cutterhead stop fully before you change the depth or clear chips. The blades keep spinning for a few seconds after the motor is switched off.
Empty the dust bag or connect a dust collector to the 2-inch dust port. A full bag or a blocked port leaves chips on the bed, and chips pressed into the board leave marks.
How do you finish a board after planing?
Sand the planed face lightly to remove cutterhead marks, then check the thickness against your project plan. Planer marks are shallow ridges that a few passes with a random orbital sander take out.
Wipe the board down and look at it in raking light. High spots and dips show up clearly that way, before you cut joinery.
Store planed boards flat and stickered so they don't cup while they wait. Freshly planed wood can move as it takes on or gives up moisture.
If you're working through a stack of boards, keep a note of the depth setting for each one. Matching thickness across a set matters more than the exact number.
Which planer and support gear should you buy?
Pick a planer that matches your board width, then budget for infeed and outfeed support. Most home shops do fine with a 12.5-inch machine like the WEN PL1252, which handles the wide boards most furniture projects need.
Compare machines in our guide to the best benchtop planers before you commit. A helical planer costs more but uses replaceable cutter inserts instead of long blades.
If your boards are long, the support matters as much as the machine. A roller stand or a set of folding tables keeps the board level and reduces snipe on every pass.
Practice the sequence on scrap first: joint a face, set a light depth, feed with the grain, measure, repeat. That routine is the whole skill of how to use a benchtop planer well.
Frequently asked questions
Can a benchtop planer make a board flat?
No. A benchtop planer makes the top face parallel to the bottom face, so the bottom face has to be flat first.
Joint one face flat with a jointer or a sled, then let the planer bring the board to an even thickness.
How much should I take off in one pass?
Keep it to 1/32 inch or less on hardwood and no more than 1/16 inch on softwood. The WEN PL1252 can take up to 1/8 inch per pass, but light cuts give a cleaner finish and put less strain on the motor.
Why does the end of my board come out thinner?
That dip is snipe, caused when the board loses support as it leaves the cutterhead. Long infeed and outfeed tables, or roller stands set level with the planer bed, hold the board up and keep the last few inches at full thickness.
Do I need to plane both faces of a board?
Planer marks show on whichever face the cutterhead touches last. If the board's second face will show, flip it and take a very light final pass so both faces read cleanly.